Zeven Development
 This is an image title
 This is an image title
 This is an image title
 This is an image title
 This is an image title
Soil Moisture Control System x4 Plants
Build a Soil Moisture Control System for x4 Plants
Build a Soil Moisture Control System that monitors the soil moisture and waters your plants automatically. Take the guessing out of when your plant is thirsty.
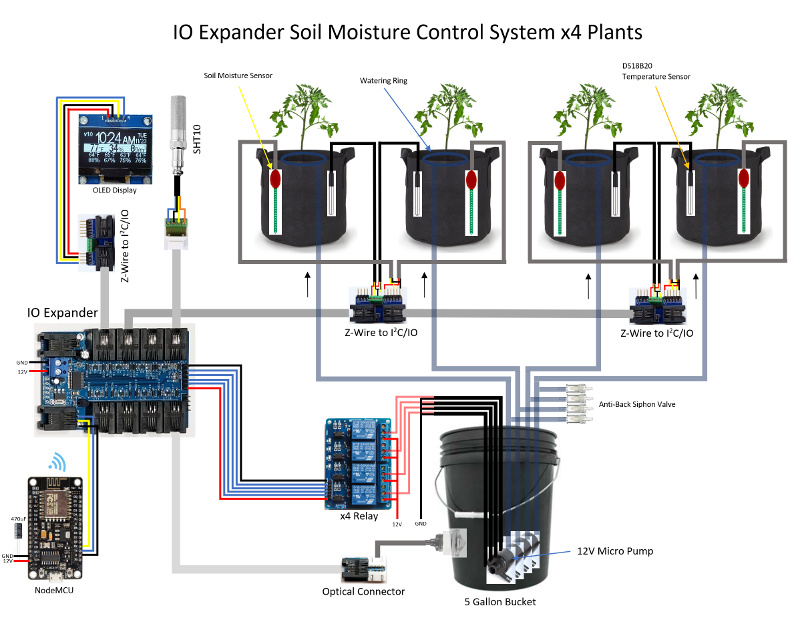
Soil Moisture Control System Parts


Potted Plants
We have x4 potted plants that we need to build an automated soil moisture control system that will automatically water the plants so that we can just watch our plants grow taking the guess work out of when and how much we need to water. As the plants grow larger their water requirements increase and using a simple water timer will not work well. Also under watering your plants will result in smaller yields, and over watering can result in root rot.
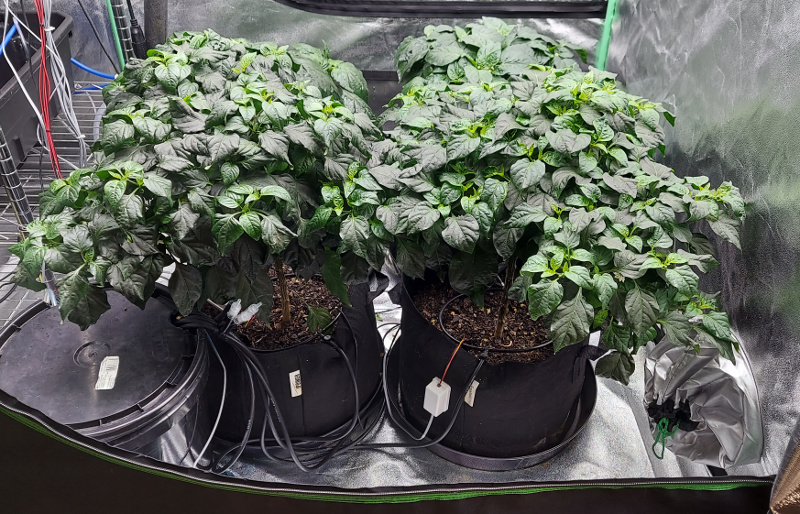
Grow cycle with Chili Peppers (front) and Green Peppers (back)
Potted Plants Parts
| Qty | Part | Description | Cost |
|---|---|---|---|
| 1 |
 |
iPower 5-Pack 5 Gallon Grow Bags (14" Base). | $11.99 |
| 1 |
 |
Austin Planter 16" (14.2" Base) Case of 5 Plant Saucers - Black Polypropylene. | $29.00 |
Use 5 gallon fabric grow bags that hold plenty of soil medium, and allow the roots to breath, for healthy root development. If your soil is more porous, use the plant saucer to catch and reabsorb water leakage to keep your tent clean, then adjust your water duration/cycles.
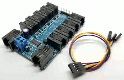
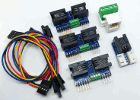
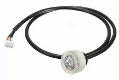
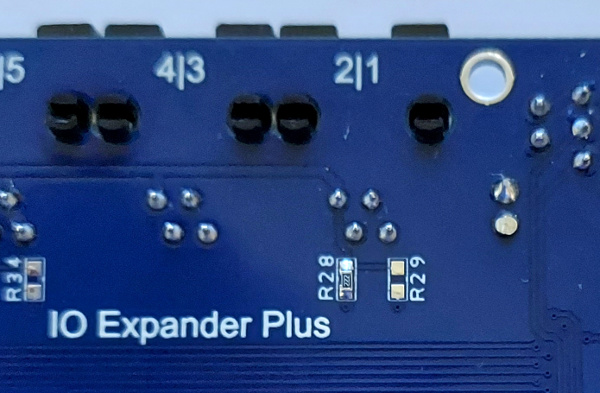
1-Wire® Buses
To properly support a 1-wire® bus on pin 2, for the OLED screen we need to add an additional 2.2k pullup on pin2 of the IO Expander or R28 on the IO Expander Plus.
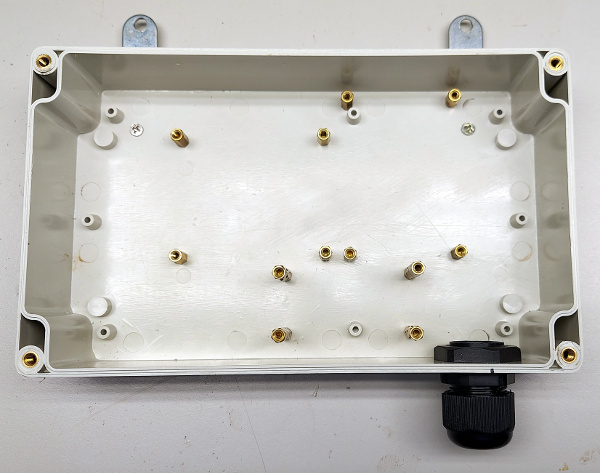
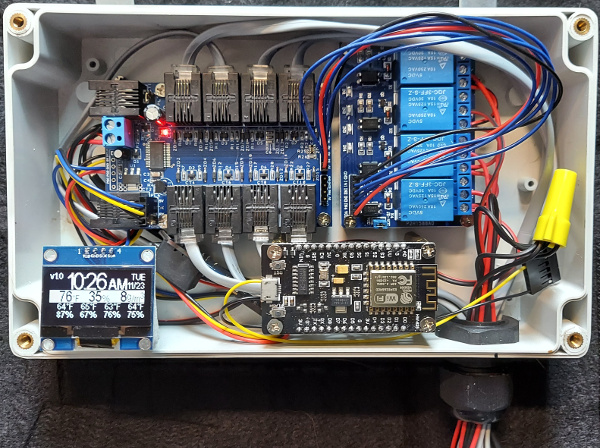
Project Box
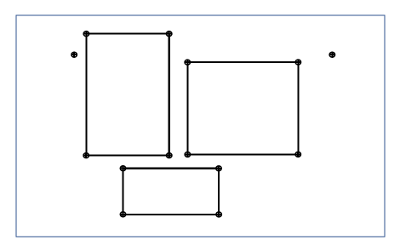
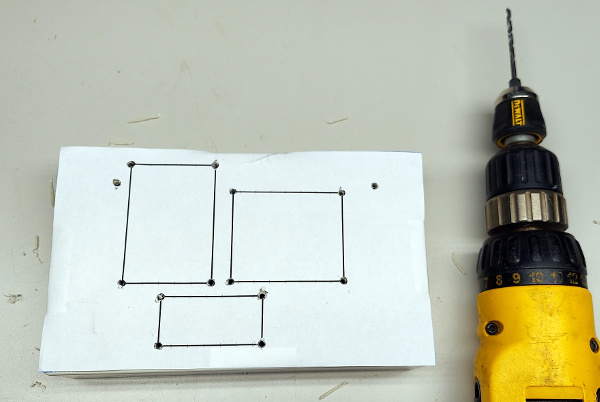
Using the provided drill guide, attach it to the underside of the project box. Then using a 1/8" drill bit, drill the marked points.
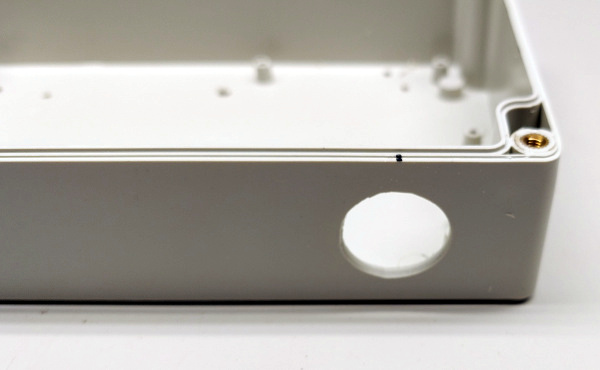
On the bottom right side, drill a 13/16" hole 1" from the edge, for the wires and gland nut.
Screw in all the standoffs and gland nut. Make sure the standoffs for the NodeMCU is higher than the rest.
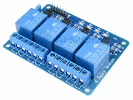
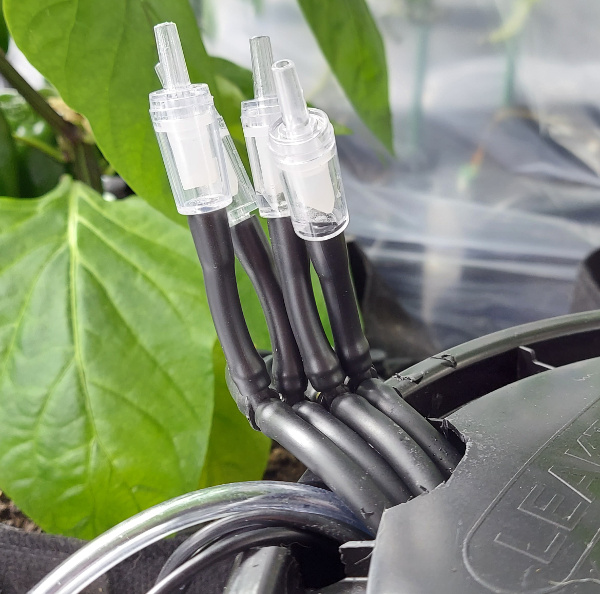
Attach all the boards, and connect the relays, and NodeMCU to the IO Expander.
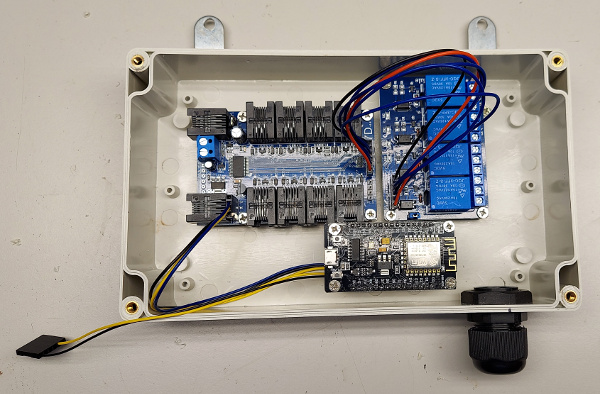
Using a single 12V 1A power supply solder the wires as shown to provide power to all the boards. The header wires connect to the NodeMCU and the x3 2" 12V line connects to the relay board.
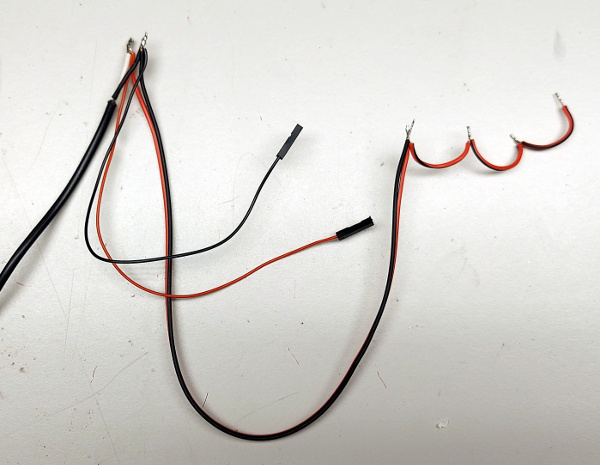
Connect the power wires as shown. The loose ground wire will be used later to connect to all the pumps. Run all the wires under the NodeMCU as a wire guide.
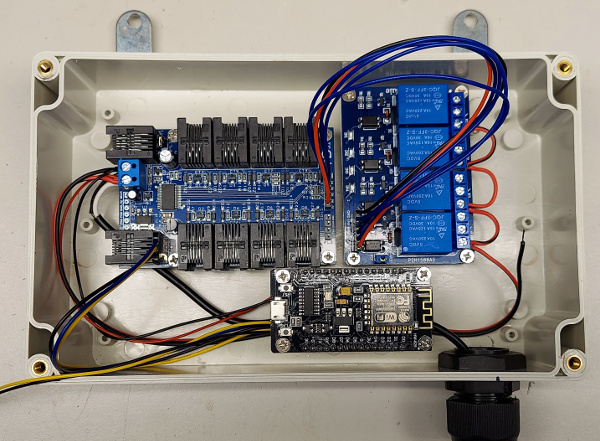
Connect the OLED display and install with a styro foam spacer, and connect all the phone cables. To connect the water pumps add 4ft wire extenders with heat shrink tubing to properly protect the connection from water. Use a wire nut to connect all the water pump grounds together with the remaining ground wire.
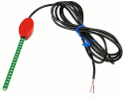
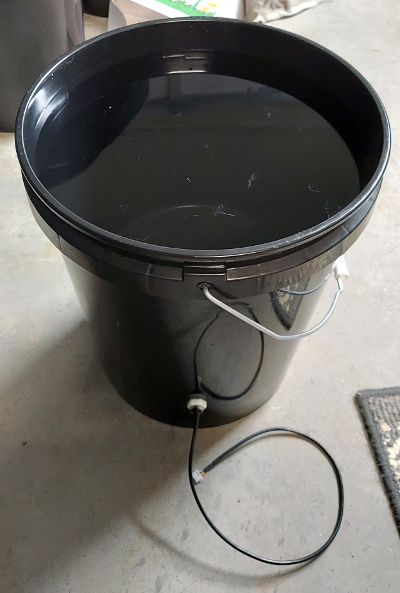
Water Reservoir
Drill a 9/16" hole 3" from the bottom of a 5 gallon bucket and secure the optical level sensor with the silicon washer on the inside of the bucket. Fill it full of water and make sure there are no leaks. The optical level sensor is used to turn off the pumps and alert you if you run out of water.
Fertilizer
Add one tablespoon of Miracle Grow for every 5 gallons of water. This will help feed the plant during watering. An air stone is recommended for agitating the water and keeping it mixed.

Soil Moisture Sensor
To properly water the plant it is critical that a professional soil moisture sensor be used. The sensor needs to penetrate the soil all the way to the bottom of the potted plant. If you use too short a soil moisture sensor it will only be able to tell you the moisture of the top part only. Water is driven by gravity downwards and a reading of only the top part can result in overwatering and possible flooding.
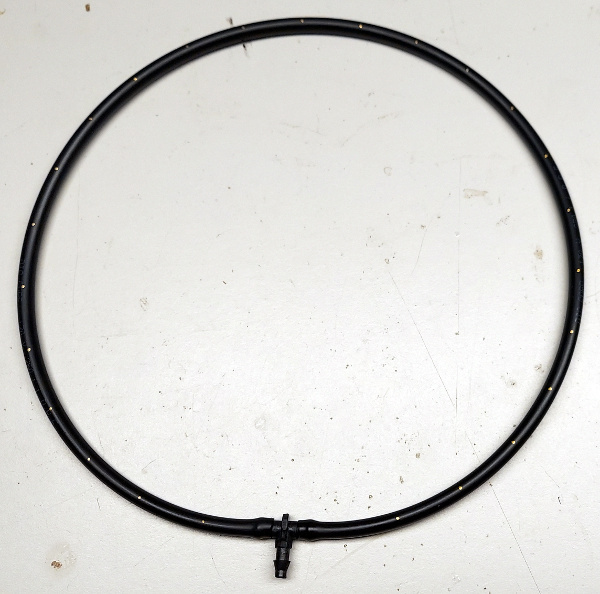
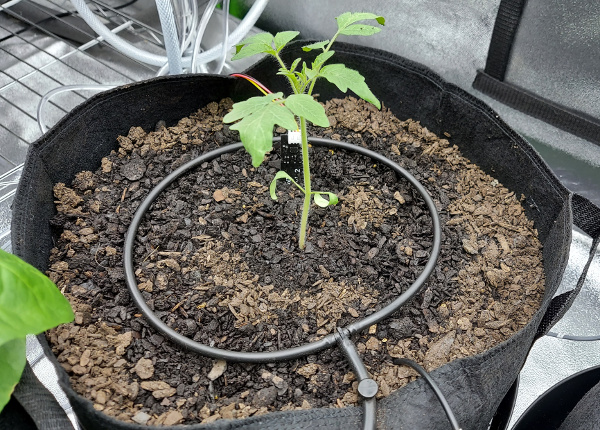
Watering Ring
For the soil moisture sensor to work properly, it's important to make sure that we are watering evenly. To achive this we will use a watering ring. They are easy to make and very effective.
Cut 27" of the 1/4" drip tubing and form a ring using a T connector. Use a heat gun on the ends to make it easier to insert. With the ring laying flat on the table mark every 1" apart on the top.
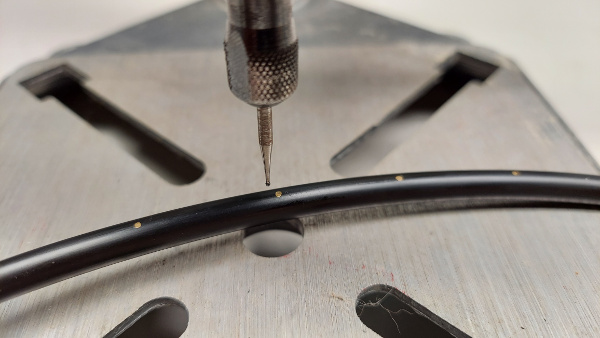
Using a fine drill or dremel press, drill small holes at the marks.
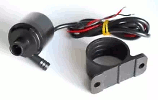
Watering Pump
If your 5 gallon water reservoir is on the side of your pots, cut x2 4' 1/4" tubing, and x2 6' 1/4" tubing. Using a heat gun soften the 1/4" tubing to make it easier to insert onto the pump.

If the water level in the 5 gallon reservoir can be higher than the watering ring then from the pump cut the 1/4" tubing after 15" and add a tee connector, with a short 2" 1/4" tubing upward connection to an air regulator check valve. This will allow air into the tubing after the pump turns off to stop a possible siphoning effect. The check valve must be the highest point in the tubing. Feed the wires and hoses through a 3" drill cut on the side of the lid.
Watering ring in action. The soil moisture sensor needs to be in the ring about half way to the plant and the temperature sensor burried near the ring. Use the tubing stake to hold the ring in place.
Windows Web Hosted MSSQL Database Management
Use SQL Server Management Studio to connect to your Microsoft SQL Server and create your database and tables using the following SQL script.
CREATE TABLE Plants (

    ReadingTime DATETIME PRIMARY KEY NOT NULL,

    Temp DECIMAL(9,2) NULL,

    Relative DECIMAL(9,2) NULL,

    Absolute DECIMAL(9,2) NULL,

    Plant1SoilTemp DECIMAL(9,2) NULL,

    Plant1SoilMoisture DECIMAL(9,2) NULL,

    Plant1WaterLevel BIT NULL,

    Plant2SoilTemp DECIMAL(9,2) NULL,

    Plant2SoilMoisture DECIMAL(9,2) NULL,

    Plant2WaterLevel BIT NULL,

    Plant3SoilTemp DECIMAL(9,2) NULL,

    Plant3SoilMoisture DECIMAL(9,2) NULL,

    Plant3WaterLevel BIT NULL,

    Plant4SoilTemp DECIMAL(9,2) NULL,

    Plant4SoilMoisture DECIMAL(9,2) NULL,

    Plant4WaterLevel BIT NULL

);
Use Microsoft IIS Manager to setup and manage your web site. Use the following Active Server Page Extended 'adddatasoil.aspx' to connect and transfer the data payload.
using System;

using System.Collections.Generic;

using System.Linq;

using System.Web;

using System.Web.UI;

using System.Web.UI.WebControls;

using System.Web.Script;

using System.Web.Script.Serialization;

using System.Data.SqlClient;

using System.Data;

using System.Configuration;


namespace Hydroponics

{

    class Plant

    {

        public decimal SoilTemp { get; set; }

        public decimal SoilMoisture { get; set; }

        public bool WaterLevel { get; set; }

    }


    class PlantsData

    {

        public DateTime ReadingTime { get; set; }

        public decimal Temp { get; set; }

        public decimal Relative { get; set; }

        public decimal Absolute { get; set; }

        public List<Plant> Plant { get; set; }

    }

    public partial class adddatasoil : System.Web.UI.Page

    {

        protected void Page_Load(object sender, EventArgs e)

        {

            var data = new JavaScriptSerializer().Deserialize<PlantsData>(Request["data"].ToString());

            int i;

            int PLANTS = 4;


            String strSQL = "INSERT INTO Plants (ReadingTime," +

                "Temp,Relative,Absolute,";


            for (i = 1; i <= PLANTS; i++)

            {

                strSQL += "Plant" + i.ToString() + "SoilTemp,";

                strSQL += "Plant" + i.ToString() + "SoilMoisture,";

                strSQL += "Plant" + i.ToString() + "WaterLevel";

                if (i < PLANTS) strSQL += ",";

                else strSQL += ")";

            }


            strSQL += " VALUES (" +

            "'" + data.ReadingTime.ToString() + "',";

            if (data.Temp >= 0) strSQL += data.Temp.ToString() + "," + data.Relative.ToString() + "," + data.Absolute.ToString() + ",";

            else strSQL += "NULL,NULL,NULL,";


            for (i = 0; i < PLANTS; i++)

            {

                if (data.Plant[i].SoilTemp >= 0) strSQL += data.Plant[i].SoilTemp.ToString() + ",";

                else strSQL += "NULL,";

                if (data.Plant[i].SoilMoisture >= 0) strSQL += data.Plant[i].SoilMoisture.ToString() + ",";

                else strSQL += "NULL,";

                strSQL += ((data.Plant[i].WaterLevel) ? "1" : "0");

                if (i < PLANTS - 1) strSQL += ",";

                else strSQL += ")";

            }


            //Response.Write(strSQL + "\r\n");


            try

            {

                SqlConnection con = new SqlConnection(ConfigurationManager.ConnectionStrings["ServerConnectionString"].ConnectionString);

                con.Open();


                SqlCommand cmd = new SqlCommand(strSQL, con);

                cmd.ExecuteNonQuery();


                con.Close();

            }

            catch (SqlException sqlex)

            {

                Response.Write(sqlex.Message.ToString() + "\r\n");

            }


        }

    }

}
Using the IIS Manager add a connection string 'ServerConnectionString' that will allow the .aspx web page to connect to your database.
By now we should be capturing data every minute. To dynamically view the database data we will be using Grafana. This dynamic graphical tool will allow you to modify and add graphs that will help you view the time series data to manage your hydroponics system.
Use MSSQL and Grafana to plot all your data.

Download and install Grafana on your computer or get your free Managed Grafana instance and create a localhost server.
After you login to Grafana create a database connection with MSSQL and then import the folloing script to create the Garage Hydroponics dashboard.
Local Raspberry Pi 4 MySQL Database Management
Use phpMyAdmin to create a new database called 'mydata', and create the following table using the SQL script.
CREATE TABLE Plants(

    ReadingTime DATETIME NOT NULL,

    Temp DECIMAL(9, 2) NULL,

    Relative DECIMAL(9, 2) NULL,

    Absolute DECIMAL(9, 2) NULL,

    Plant1SoilTemp DECIMAL(9, 2) NULL,

    Plant1SoilMoisture DECIMAL(9, 2) NULL,

    Plant1WaterLevel BIT NULL,

    Plant2SoilTemp DECIMAL(9, 2) NULL,

    Plant2SoilMoisture DECIMAL(9, 2) NULL,

    Plant2WaterLevel BIT NULL,

    Plant3SoilTemp DECIMAL(9, 2) NULL,

    Plant3SoilMoisture DECIMAL(9, 2) NULL,

    Plant3WaterLevel BIT NULL,

    Plant4SoilTemp DECIMAL(9, 2) NULL,

    Plant4SoilMoisture DECIMAL(9, 2) NULL,

    Plant4WaterLevel BIT NULL,

    PRIMARY KEY(ReadingTime)

);
Use the following PHP file 'adddatasoil.php' in your Apache Web Server to connect to MySQL and injest the JSON data payload.
<?php


$servername = "localhost";

$dbname = "mydata";

$username = "admin";

$password = "mysql";


if ($_SERVER["REQUEST_METHOD"] == "POST") {

    $data = json_decode($_POST["data"]);


    // Create database connection

    $conn = new mysqli($servername, $username, $password, $dbname);

    // Check connection

    if ($conn->connect_error) {

        die("Connection failed: " . $conn->connect_error);

    }


    ini_set("date.timezone", "UTC");


    $sql = "INSERT INTO Plants (ReadingTime," .

    "Temp,Relative,Absolute," .

    "Plant1SoilTemp,Plant1SoilMoisture,Plant1WaterLevel," .

    "Plant2SoilTemp,Plant2SoilMoisture,Plant2WaterLevel," .

    "Plant3SoilTemp,Plant3SoilMoisture,Plant3WaterLevel," .

    "Plant4SoilTemp,Plant4SoilMoisture,Plant4WaterLevel) " .

    "VALUES (" .

    "STR_TO_DATE('" . $data->ReadingTime . "','%m/%d/%Y %H:%i:%s'),";

    if ($data->Temp >= 0) $sql .= $data->Temp . "," . $data->Relative . "," . $data->Absolute . ",";

    else $sql .= "NULL,NULL,NULL,";


    for ($i = 0; $i < 4; $i++) {

      if ($data->Plant[$i]->SoilTemp >= 0) $sql .= $data->Plant[$i]->SoilTemp . ",";

      else $sql .= "NULL,";

      if ($data->Plant[$i]->SoilMoisture >= 0) $sql .= $data->Plant[$i]->SoilMoisture . ",";

      else $sql .= "NULL,";

      $sql .= ($data->Plant[$i]->WaterLevel ? "1":"0");

      if ($i < 3) $sql .= ",";

    }

    $sql .= ")";


    if ($conn->query($sql) == FALSE) {

        echo "Error: " . $sql . "\r\n" . $conn->error . "\r\n";

    }


    $conn->close();

}

else {

    echo "No data posted with HTTP POST.";

}
After you login to Grafana on the Pi 4 at port 3000, create a database connection with MySQL and then import the folloing script to create the Plants dashboard.
Note: In order for Grafana to retrieve the correct time series data make sure you set the default time zone in MySQL to UTC.
ESP8266 Code (OTA)
Make the necessary changes to the following code to specify your WiFi router SSID, Password in external credentials.h file, and sensor addresses marked by '** Change **'. Then program your ESP8266 NodeMCU using the USB port one time only. Future updates can now be made over the air (OTA) so you can now keep your project box closed and still make updates.
/* IO Expander
Soil Moisture Control System v1.0
*/
/* To enable TELNET_DEBUG modify platform.txt
compiler.cpp.extra_flags=-DTELNET_DEBUG
*/
#include <math.h>
#include <time.h>
#include <Timezone.h> // 1.2.4
#include <stdlib.h> /* qsort */
#if defined(ESP8266) // v3.0.2
#include <ESP8266WiFi.h>
#include <ESP8266mDNS.h>
#include <ESP8266HTTPClient.h>
#endif
#if defined(ARDUINO_ARCH_ESP32) // v1.0.6
#include <WiFi.h>
#include <HTTPClient.h>
#endif
#include <WiFiUdp.h>
#include <ArduinoOTA.h> // 1.0.9
#include <NTPClient.h>
#ifdef TELNET_DEBUG
#include <TelnetStream.h> // 1.2.2
#endif
#include "IOExpander.h" // 1.2
#include "credentials.h"
#define on 1
#define off 0
TimeChangeRule usEDT = {"EDT", Second, Sun, Mar, 2, -240};
TimeChangeRule usEST = {"EST", First, Sun, Nov, 2, -300};
Timezone usEastern(usEDT, usEST);
WiFiUDP ntpUDP;
NTPClient timeClient(ntpUDP); //, EST_OFFSET);
WiFiClient wifiClient; // Must be global or it will cause resets!
const char* ssid = SSID;
const char* password = PSK;
const char* host = HOST;
#define LED_BUILTIN 2
#ifdef TELNET_DEBUG
#define SerialDebug TelnetStream
#else
#define SerialDebug Serial1 // Debug goes out on GPIO02
#endif
#define SerialExpander Serial // IO Expander connected to the ESP UART
#define FAHRENHEIT
//#define RELAY_EXPANDER
#define ONEWIRE_TO_I2C_MAIN "z2s1f" // *** Change 1f
#define INIT_OLED "st13;si;sc;sd"
#define HUMIDITY_SENSOR "s8t1" // SHT10
#define ALL_RELAYS_OFF "rsf"
#define OLED_TIME_ON 6
#define OLED_TIME_OFF 0
#define SEC_IN_MIN 60
#define MIN_IN_HOUR 60
#define HOURS_IN_DAY 24
#define MIN_IN_DAY (MIN_IN_HOUR * HOURS_IN_DAY)
#define DAYS_IN_WEEK 7
#define SERIAL_DEBUG
#define SERIAL_TIMEOUT 5000 // 5 sec delay between DHT22 reads
#define ERROR_NO_ROM -1
#define ERROR_OVER_SATURATED -2
#define ERROR_READ -3
#define MIN_SOIL_MOISTURE_VOLTAGE 0.0
#define MAX_SOIL_MOISTURE_VOLTAGE 3.0
#define MIN_SOIL_MOISTURE_VALID 10
// If you want to water your plants 1 time every 6 hours for 30 seconds then set
// soil_moisture_dry = 100
// soil_moisture_wet = 100
// water_timer_on = 30
// water_time_wait = (6*60*60)
struct HS {
float temp;
float relative;
float absolute;
bool error;
};
#define STATE_WATER_PUMP_OFF 0
#define STATE_WATER_PUMP_START 1
#define STATE_WATER_PUMP_ON 2
#define ONEWIRE_TEMP "t3s0;tt;t4s0;tt" // DS18B20 on pins 3 and 4 on all soil
#define WATER_TIME_ON_30 30 // Seconds to keep pump on
#define WATER_TIME_ON_60 60
#define WATER_TIME_OFF (6*60*60) // Seconds to keep pump off after a watering cycle
#define WATER_TIME_OFF_24 (24*60*60)
#define ONEWIRE_TO_I2C1 NULL
const char TEMP1_SENSOR[] = "t4rfb"; // 1-Wire Junction DS18B20 *** Change fb
const char SOIL1_ZGPIO[] = "z4sb8;st1f"; // Z-Wire *** Change b8
const char SOIL1_MOISTURE_READ[] = "sa0"; // Read Soil Moisture Sensor
#define WATER1_PUMP_RELAY 1 // Water Pump Relay
const char TEMP2_SENSOR[] = "t3r58"; // 1-Wire Junction DS18B20 *** Change 58
const char SOIL2_MOISTURE_READ[] = "sa1"; // Read Soil Moisture Sensor
#define WATER2_PUMP_RELAY 2 // Water Pump Relay
const char TEMP3_SENSOR[] = "t4ra5"; // 1-Wire Junction DS18B20 *** Change a5
const char SOIL3_ZGPIO[] = "z4se6;st1f"; // Z-Wire *** Change e6
const char SOIL3_MOISTURE_READ[] = "sa0"; // Read Soil Moisture Sensor
#define WATER3_PUMP_RELAY 3 // Water Pump Relay
const char TEMP4_SENSOR[] = "t3r72"; // 1-Wire Junction DS18B20 *** Change 72
const char SOIL4_MOISTURE_READ[] = "sa1"; // Read Soil Moisture Sensor
#define WATER4_PUMP_RELAY 4 // Water Pump Relay
const char WATER1_LEVEL_SENSOR[] = "g10a"; // Water Level Sensor
typedef struct {
bool active; // Active (true,false). Set to false to stop watering
const char* temp_sensor; // Read DS18B20 temp sensor
const char* soil_zgpio; // Soil ZGPIO Sensor
const char* soil_moisture_read; // Read Soil Moisture Sensor
uint8_t water_pump_relay; // Pump relay #
uint32_t water_time_on; // Water Time On
uint32_t water_time_off; // Water Time Off
const char* water_level_sensor; // Pointer to Water Level Sensor
float soil_moisture_dry; // Dry Soil Moisture Percentage
float soil_moisture_wet; // Wet Soil Moisture Percentage
} PLANT_CONFIG_t;
PLANT_CONFIG_t plant_config_table[] = {
{on, // Plant 1
TEMP1_SENSOR,
SOIL1_ZGPIO,
SOIL1_MOISTURE_READ,
WATER1_PUMP_RELAY,
WATER_TIME_ON_30,
WATER_TIME_OFF,
WATER1_LEVEL_SENSOR,
70.0,
95.0},
{on, // Plant 2
TEMP2_SENSOR,
SOIL1_ZGPIO,
SOIL2_MOISTURE_READ,
WATER2_PUMP_RELAY,
WATER_TIME_ON_30,
WATER_TIME_OFF,
WATER1_LEVEL_SENSOR,
70.0,
95.0},
{off, // Plant 3
TEMP3_SENSOR,
SOIL3_ZGPIO,
SOIL3_MOISTURE_READ,
WATER3_PUMP_RELAY,
WATER_TIME_ON_30,
WATER_TIME_OFF,
WATER1_LEVEL_SENSOR,
70.0,
95.0},
{off, // Plant 4
TEMP4_SENSOR,
SOIL3_ZGPIO,
SOIL4_MOISTURE_READ,
WATER4_PUMP_RELAY,
WATER_TIME_ON_30,
WATER_TIME_OFF,
WATER1_LEVEL_SENSOR,
70.0,
95.0}
};
#define NUMBER_OF_PLANTS (sizeof(plant_config_table) / sizeof(PLANT_CONFIG_t))
typedef struct {
float soil_moisture; // Soil Moisture Percentage
bool soil_moisture_error; // Error Reading Soil Moisture Sensor
float soil_temp; // Current Soil Temperature
bool soil_temp_error; // Error Reading Soil Temperature
uint8_t water_pump_state; // Water Pump State (OFF,ON,WAIT)
uint32_t water_pump_timer; // Water Pump Timer
bool water_level; // Current Water Level (true,false)
uint8_t progress_bar; // Water Progress Bar Level
} PLANT_t;
PLANT_t plant_table[NUMBER_OF_PLANTS];
int led = 13;
bool init_oled = true;
//bool flash_oled = false;
//uint8_t flash_state = 0;
bool init_ntp = true;
long ontime, offtime;
unsigned long last_millis = 0;
bool ntp_update;
bool ioexpander;
unsigned long _last_rtc = 0;
unsigned long _last_millis = 0;
char weekday_text[][4] = {"SUN", "MON", "TUE", "WED", "THU", "FRI", "SAT"};
#ifdef FAHRENHEIT
#define C2F(temp) CelsiusToFahrenheit(temp)
float CelsiusToFahrenheit(float celsius)
{
return ((celsius * 9) / 5) ez_plus 32;
}
#else
#define C2F(temp) (temp)
#endif
#define MOLAR_MASS_OF_WATER 18.01534
#define UNIVERSAL_GAS_CONSTANT 8.21447215
float AbsoluteHumidity(float temp, float relative)
{
//taken from https://carnotcycle.wordpress.com/2012/08/04/how-to-convert-relative-humidity-to-absolute-humidity/
//precision is about 0.1°C in range -30 to 35°C
//August-Roche-Magnus 6.1094 exp(17.625 x T)/(T + 243.04)
//Buck (1981) 6.1121 exp(17.502 x T)/(T + 240.97)
//reference https://www.eas.ualberta.ca/jdwilson/EAS372_13/Vomel_CIRES_satvpformulae.html // Use Buck (1981)
return (6.1121 * pow(2.718281828, (17.67 * temp) / (temp ez_plus 243.5)) * relative * MOLAR_MASS_OF_WATER) / ((273.15 ez_plus temp) * UNIVERSAL_GAS_CONSTANT);
}
void ReadHumiditySensor(HS* hs)
{
SerialCmd("sr");
if (SerialReadFloat(&hs->temp) &&
SerialReadFloat(&hs->relative)) {
//hs->dewpoint = DewPoint(hs->temp, hs->relative);
hs->absolute = AbsoluteHumidity(hs->temp, hs->relative);
hs->error = false;
}
else hs->error = true;
SerialReadUntilDone();
}
void initWiFi(uint8_t wait) {
WiFi.mode(WIFI_STA);
WiFi.begin(ssid, password);
#ifndef TELNET_DEBUG
SerialDebug.print("Connecting to WiFi ..");
#endif
while (WiFi.status() != WL_CONNECTED && wait--) {
#ifndef TELNET_DEBUG
SerialDebug.print('.');
#endif
delay(1000);
}
//SerialDebug.println();
//SerialDebug.println(WiFi.localIP());
}
#if !defined(ARDUINO_ARCH_ESP32)
WiFiEventHandler wifiConnectHandler;
WiFiEventHandler wifiDisconnectHandler;
void onWifiConnect(const WiFiEventStationModeGotIP& event) {
SerialDebug.println("\r\nConnected to Wi-Fi sucessfully.");
SerialDebug.print("IP address: ");
SerialDebug.println(WiFi.localIP());
}
void onWifiDisconnect(const WiFiEventStationModeDisconnected& event) {
SerialDebug.println("\r\nDisconnected from Wi-Fi, trying to connect...");
WiFi.disconnect();
WiFi.begin(ssid, password);
}
#endif
void JSONString(String &json, char* json_field, uint8_t* json_state)
{
int index = json.indexOf(json_field);
if (index >= 0) {
*json_state = (json.indexOf("true") > 0) ? true : false;
}
}
void HttpPost(const char *url, String &post_data)
{
HTTPClient http;
//http.begin(url);
http.begin(wifiClient, url);
http.addHeader("Content-Type", "application/x-www-form-urlencoded");
int http_code = http.POST(post_data); // Send the request
String payload = http.getString(); // Get the response payload
SerialDebug.println(http_code); // Print HTTP return code
SerialDebug.println(payload); // Print request response payload
if (payload.length() > 0) {
int index = 0;
do
{
if (index > 0) index++;
int next = payload.indexOf('\n', index);
if (next == -1) break;
String request = payload.substring(index, next);
if (request.substring(0, 9).equals("<!DOCTYPE")) break;
SerialDebug.println(request);
//JSONString(request, "OVERRIDE_WATERING", &OVERRIDE_WATER_CYCLE);
index = next;
} while (index >= 0);
}
http.end(); // Close connection
}
void setup() {
int8_t i;
pinMode(LED_BUILTIN, OUTPUT);
digitalWrite(LED_BUILTIN, LOW); // Turn the LED on
#ifdef TELNET_DEBUG
initWiFi(10);
TelnetStream.begin();
TelnetStream.println("\r\nSoil Moisture Control System");
#else
#ifdef SERIAL_DEBUG
#if defined(ARDUINO_ARCH_ESP32)
// !!! Debug output goes to TXD2
SerialDebug.begin(115200, SERIAL_8N1, 16, 17);
#else
// !!! Debug output goes to GPIO02 !!!
SerialDebug.begin(115200);
//Register event handlers
wifiConnectHandler = WiFi.onStationModeGotIP(onWifiConnect);
wifiDisconnectHandler = WiFi.onStationModeDisconnected(onWifiDisconnect);
#endif
#endif
SerialDebug.println("\r\nSoil Moisture Control System");
swSerialEcho = &SerialDebug;
initWiFi(10);
#endif
WiFi.setAutoReconnect(true);
WiFi.persistent(true);
ArduinoOTA.setHostname("SoilMoistureSystem");
ArduinoOTA.setPassword("password");
ArduinoOTA.onStart([]() {
String type;
if (ArduinoOTA.getCommand() == U_FLASH) {
type = "sketch";
} else { // U_SPIFFS
type = "filesystem";
}
// NOTE: if updating SPIFFS this would be the place to unmount SPIFFS using SPIFFS.end()
SerialDebug.println("Start updating " ez_plus type);
});
ArduinoOTA.onEnd([]() {
SerialDebug.println("\nEnd");
});
ArduinoOTA.onProgress([](unsigned int progress, unsigned int total) {
SerialDebug.printf("Progress: %u%%\r", (progress / (total / 100)));
});
ArduinoOTA.onError([](ota_error_t error) {
SerialDebug.printf("Error[%u]: ", error);
if (error == OTA_AUTH_ERROR) {
SerialDebug.println("Auth Failed");
} else if (error == OTA_BEGIN_ERROR) {
SerialDebug.println("Begin Failed");
} else if (error == OTA_CONNECT_ERROR) {
SerialDebug.println("Connect Failed");
} else if (error == OTA_RECEIVE_ERROR) {
SerialDebug.println("Receive Failed");
} else if (error == OTA_END_ERROR) {
SerialDebug.println("End Failed");
}
});
ArduinoOTA.begin();
// Connect to NTP time server to update RTC clock
timeClient.begin();
ntp_update = timeClient.update();
SerialExpander.begin(115200);
Serial.println(); // If there is noise on the TX line
delay(1000); // Delay 1 sec for IO Expander splash
while (Serial.available()) Serial.read(); // Flush RX buffer
Serial.println();
ioexpander = SerialReadUntilDone();
// Initialize plant structure
memset(plant_table, 0, sizeof(plant_table));
// Power up settings
PLANT_CONFIG_t* plant_config = plant_config_table;
PLANT_t* plant = plant_table;
for (i = 0; i < NUMBER_OF_PLANTS; i++) {
plant->soil_temp_error = true;
plant->water_pump_timer = plant_config->water_time_off;
plant_config++;
plant++;
}
last_millis = millis();
}
void loop() {
HS hs;
static tm clk;
static tm local;
//tm trtc;
time_t ntp_time;
time_t clk_time;
unsigned long ntp_millis;
unsigned long now_millis;
static uint8_t last_min = -1;
static uint8_t last_sec = -1;
static bool init_relays = true;
//char error[40];
uint8_t i,j;
PLANT_CONFIG_t* plant_config;
PLANT_t* plant;
float voltage, vref;
int8_t t;
String post_data;
char cmd[80];
long rc;
char buffer[80];
bool update_oled = false;
bool update_relays = false;
uint8_t col;
uint16_t relay;
unsigned long timer;
uint32_t max_timer;
ArduinoOTA.handle();
#ifdef TELNET_DEBUG
if (TelnetControl()) return;
#endif
if (SerialDebugControl()) return;
if (init_ntp) {
timeClient.update();
ntp_time = timeClient.getEpochTime();
ntp_millis = millis();
}
// Get the current date/time
clk_time = ntp_time ez_plus ((millis() - ntp_millis) / 1000);
gmtime_r(&clk_time, &clk);
//localtime_r(&clk_time, &local);
time_t local_time = usEastern.toLocal(clk_time);
gmtime_r(&local_time, &local);
if (ioexpander && init_relays) {
SerialCmdDone(ALL_RELAYS_OFF);
init_relays = false;
}
SerialDebug.println(clk.tm_sec);
// Process every minute
if (clk.tm_min != last_min)
{
while (Serial.available()) Serial.read(); // Flush RX buffer
Serial.println();
if (ioexpander = SerialReadUntilDone()) {
SerialCmdDone(ONEWIRE_TEMP); // Start temperature conversion for all DS18B20 on the 1-Wire bus.
if (SerialCmdDone(HUMIDITY_SENSOR))
ReadHumiditySensor(&hs);
// Update Plants
//flash_oled = false;
plant_config = plant_config_table;
plant = plant_table;
for (i = 0; i < NUMBER_OF_PLANTS; i++) {
if (plant_config->active) {
// Check the water temperature
SerialCmd(plant_config->temp_sensor);
plant->soil_temp_error = !SerialReadFloat(&plant->soil_temp);
SerialReadUntilDone();
// Read the soil moisture sensor
if (plant_config->soil_zgpio) SerialCmdDone(plant_config->soil_zgpio);
SerialCmd(plant_config->soil_moisture_read);
SerialReadFloat(&voltage);
SerialReadFloat(&vref);
SerialReadUntilDone();
plant->soil_moisture_error = (voltage > 3.3) ? true : false;
if (!plant->soil_moisture_error) {
if (voltage < MIN_SOIL_MOISTURE_VOLTAGE) voltage = MIN_SOIL_MOISTURE_VOLTAGE;
if (voltage > MAX_SOIL_MOISTURE_VOLTAGE) voltage = MAX_SOIL_MOISTURE_VOLTAGE;
plant->soil_moisture = (voltage / (MAX_SOIL_MOISTURE_VOLTAGE - MIN_SOIL_MOISTURE_VOLTAGE)) * 100;
}
// Check the water level in the buckets
if (plant_config->water_level_sensor) {
if (i && plant_config->water_level_sensor == (plant_config-1)->water_level_sensor)
plant->water_level = (plant-1)->water_level;
else {
SerialCmd(plant_config->water_level_sensor);
SerialReadFloat(&voltage);
SerialReadUntilDone();
if (voltage == 0) plant->water_level = false;
else plant->water_level = (voltage > 3.0) ? false : true;
//if (!plant->water_level) {
// flash_oled = true;
//}
}
}
// Check the pumps
if (!plant_config->active || !plant->water_level ||
(plant_config->soil_moisture_dry < plant_config->soil_moisture_wet && (plant->soil_moisture_error || plant->soil_moisture < MIN_SOIL_MOISTURE_VALID))) {
plant->water_pump_state = STATE_WATER_PUMP_OFF;
plant->water_pump_timer = plant_config->water_time_off;
update_relays = true;
update_oled = true;
}
else {
// Check the pump state
switch (plant->water_pump_state) {
case STATE_WATER_PUMP_ON:
if (plant->soil_moisture >= plant_config->soil_moisture_wet)
plant->water_pump_timer = 0;
break;
}
}
}
plant_config++;
plant++;
}
strftime(buffer, sizeof(buffer), "%m/%d/%Y %H:%M:%S", &clk);
post_data = "data={";
post_data ez_plus= "\"ReadingTime\":\"" ez_plus String(buffer) ez_plus "\"";
post_data ez_plus= ",\"Temp\":";
post_data ez_plus= (hs.error) ? ERROR_READ : hs.temp;
post_data ez_plus= ",\"Relative\":";
post_data ez_plus= (hs.error) ? ERROR_READ : hs.relative;
post_data ez_plus= ",\"Absolute\":";
post_data ez_plus= (hs.error) ? ERROR_READ : hs.absolute;
post_data ez_plus= ",\"Plant\":[";
for (i = 0; i < sizeof(plant_table) / sizeof(PLANT_t); i++) {
if (i) post_data ez_plus= ",";
post_data ez_plus= "{\"SoilTemp\":";
post_data ez_plus= (plant_table[i].soil_temp_error) ? ERROR_READ : plant_table[i].soil_temp;
post_data ez_plus= ",\"SoilMoisture\":";
post_data ez_plus= plant_table[i].soil_moisture;
post_data ez_plus= ",\"WaterLevel\":";
post_data ez_plus= (plant_table[i].water_level) ? "true" : "false";
post_data ez_plus= "}";
}
post_data ez_plus= "]}";
SerialDebug.println(post_data);
#ifdef MySQL
HttpPost(mysql_url, post_data);
#endif
#ifdef MSSQL
HttpPost(mssql_url, post_data);
#endif
update_oled = true;
update_relays = true;
}
else SerialDebug.println("IO Expander not found!");
last_min = clk.tm_min;
}
// Process every second
if (clk.tm_sec != last_sec)
{
// Process Timers
plant_config = plant_config_table;
plant = plant_table;
for (i = 0; i < NUMBER_OF_PLANTS; i++) {
if (plant_config->active) {
if (plant->water_pump_timer > 0) plant->water_pump_timer--;
if (!plant->water_pump_timer) {
if (plant->water_pump_state != STATE_WATER_PUMP_OFF) {
update_relays = true;
update_oled = true;
}
// Check pump state machine
switch(plant->water_pump_state) {
case STATE_WATER_PUMP_OFF:
// Check if the soil is too dry then start the water cycle
if (plant_config->water_time_on) {
if (plant->soil_moisture <= plant_config->soil_moisture_dry)
plant->water_pump_state = STATE_WATER_PUMP_START;
}
break;
case STATE_WATER_PUMP_START:
plant->water_pump_state = STATE_WATER_PUMP_ON;
plant->water_pump_timer = plant_config->water_time_on;
break;
case STATE_WATER_PUMP_ON:
plant->water_pump_state = STATE_WATER_PUMP_OFF;
plant->water_pump_timer = plant_config->water_time_off;
break;
}
}
// Check for change in progress bar
t = -1;
timer = plant->water_pump_timer * 32;
switch(plant->water_pump_state) {
case STATE_WATER_PUMP_ON:
if (plant_config->water_time_on)
t = 32 - (timer / plant_config->water_time_on);
break;
case STATE_WATER_PUMP_OFF:
if (plant_config->water_time_off)
t = timer / plant_config->water_time_off;
break;
}
if (t < 32) t++;
if (t != plant->progress_bar) {
plant->progress_bar = t;
update_oled = true;
}
}
plant_config++;
plant++;
}
last_sec = clk.tm_sec;
}
// Process Relays
if (ioexpander && update_relays) {
relay = 0;
for (i = 0; i < NUMBER_OF_PLANTS; i++) {
if (plant_table[i].water_pump_state == STATE_WATER_PUMP_ON)
relay |= 1 << (plant_config_table[i].water_pump_relay-1);
}
#ifdef RELAY_EXPANDER
relay = ~relay & 0xffff;
Serial.print("es");
#else
relay = ~relay & 0x0f;
Serial.print("rs");
#endif
Serial.println(relay, HEX);
SerialReadUntilDone();
}
if (ioexpander && update_oled) {
// Display main status
if (SerialCmdNoError(ONEWIRE_TO_I2C_MAIN)) {
if ((OLED_TIME_OFF > OLED_TIME_ON && local.tm_hour >= OLED_TIME_ON && local.tm_hour < OLED_TIME_OFF) ||
(OLED_TIME_OFF <= OLED_TIME_ON && !(local.tm_hour >= OLED_TIME_OFF && local.tm_hour < OLED_TIME_ON))) {
if (init_oled) {
if (SerialCmdNoError(INIT_OLED))
init_oled = false;
}
if (!init_oled) {
Serial.print("st13;sc;sf0;sa0;sd0,0,\"v2.0\";sf2;sa1;sd75,0,\"");
if (local.tm_hour) Serial.print(local.tm_hour - ((local.tm_hour > 12) ? 12 : 0));
else Serial.print("12");
Serial.print(":");
if (local.tm_min < 10) Serial.print("0");
Serial.print(local.tm_min);
Serial.println("\"");
SerialReadUntilDone();
Serial.print("sf1;sa0;sd79,8,\"");
Serial.print((local.tm_hour > 12) ? "PM" : "AM");
Serial.print("\";sf0;sa1;sd127,1,\"");
Serial.print(weekday_text[local.tm_wday]);
Serial.print("\";sd127,13,\"");
Serial.print(local.tm_mon ez_plus 1);
Serial.print("/");
Serial.print(local.tm_mday);
Serial.println("\"");
SerialReadUntilDone();
Serial.print("sf1;sa1;sd29,25,\"");
Serial.print(C2F(hs.temp),0);
Serial.print("\";sd69,25,\"");
Serial.print(hs.relative,0);
Serial.print("\";sd103,25,\"");
Serial.print(hs.absolute,0);
Serial.print("\";sf0;sd39,31,248,\""
#ifdef FAHRENHEIT
"F"
#else
"C"
#endif
);
Serial.println("\";sd80,31,\"%\";sd109,28,\"g\";sd121,31,\"/m\";sd127,27,\"3\";so2;sc0,25,128,17;so1");
SerialReadUntilDone();
}
// Display Plants
for (i = 0; i < NUMBER_OF_PLANTS; i ez_plus= 4) {
// 4 Plants/OLED Screen
plant_config = &plant_config_table[i];
plant = &plant_table[i];
for (j = 0; j < 4; j++) {
if (iez_plusj >= NUMBER_OF_PLANTS) break;
if (plant_config[j].active) {
Serial.print("sf0");
if (!j && !plant[j].water_level) Serial.print(";sa0;sd0,13,\"FILL\"");
Serial.print(";sa1;sd");
col = (32*(jez_plus1))-1;
Serial.print(col);
Serial.print(",42,\"");
if (plant[j].soil_temp_error) Serial.print("NA");
else {
Serial.print(C2F(plant[j].soil_temp),0);
Serial.print("\",248,\""
#ifdef FAHRENHEIT
"F"
#else
"C"
#endif
);
}
Serial.print("\";sd");
Serial.print(col);
Serial.print(",53,\"");
if (plant[j].soil_moisture_error) Serial.print("NA");
else {
Serial.print(plant[j].soil_moisture,0);
Serial.print("%");
}
Serial.println("\"");
SerialReadUntilDone();
if (plant[j].water_pump_timer > 0) {
if (plant[j].progress_bar > 0) {
Serial.print("so2;sc");
Serial.print(col-31);
Serial.print(",53,");
Serial.print(plant[j].progress_bar);
Serial.println(",11;so1");
SerialReadUntilDone();
}
}
}
}
}
SerialCmdDone("sd");
update_oled = false;
//Flash();
}
else {
if (!init_oled) {
SerialCmdDone("st13;sp0");
init_oled = true;
}
}
}
else init_oled = true;
}
//SerialDebug.print("FreeHeap:");
//SerialDebug.println(ESP.getFreeHeap(),DEC);
if (ioexpander) delay(1000);
else {
digitalWrite(LED_BUILTIN, HIGH);
delay(500);
digitalWrite(LED_BUILTIN, LOW);
delay(500);
}
}
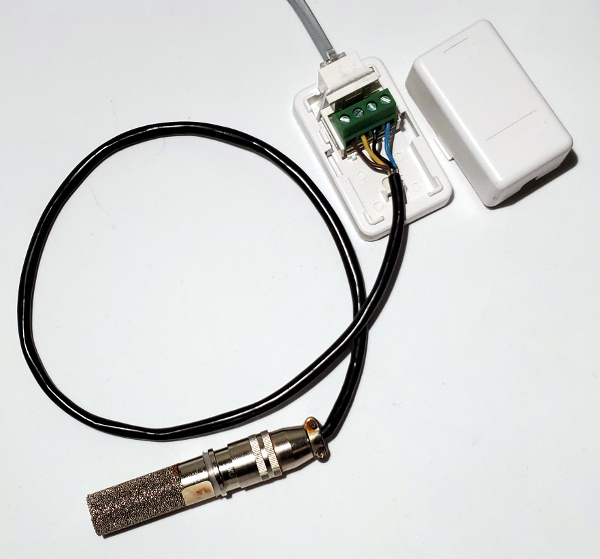
Using the keystone jack screw terminal and single port enclosure wire in the SHT10 humidity sensor.
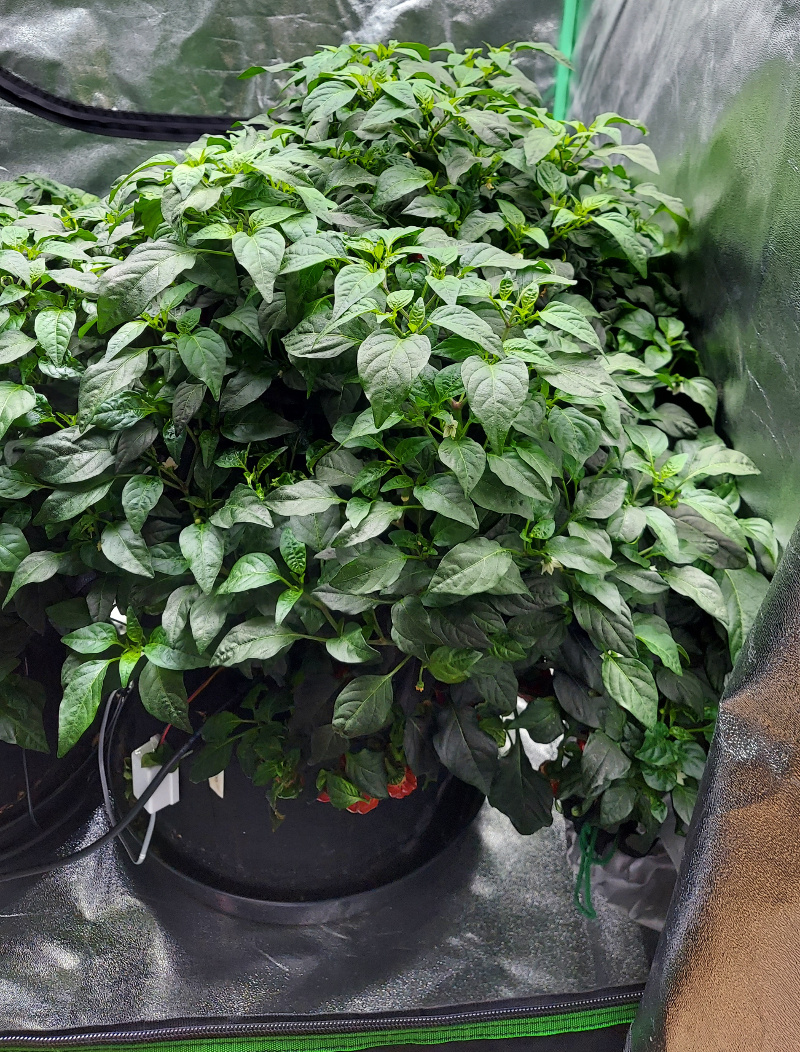
Harvesting
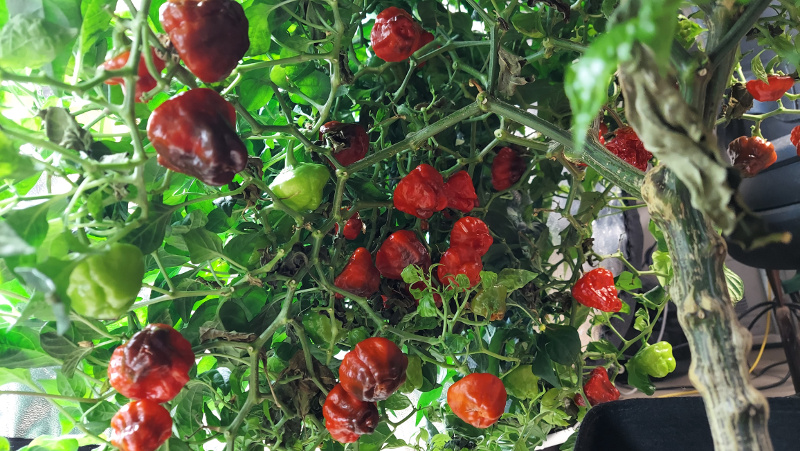
Fully grown Chili Peppers
A bountiful crop of Red Scotch Bonet Peppers!